Jul 28, 2026 · 11 min read · Guide
Why Your Scanned PDF Came Out Garbled (And How To Fix It Before You Scan)
You ran a scanned contract through OCR, opened the result, searched for a name you know is on page three, and got nothing. Or worse — you got something, but the account number came back with a 5 where an S should be, and you only noticed after it went into a spreadsheet.
Almost every OCR failure is decided before the file reaches the software. By the time you have a 150 DPI JPEG of a slightly skewed page photographed under a desk lamp, no engine on earth will read it reliably. The good news is that the handful of things that matter are all things you control, and most of them take one setting change.
Key takeaways
- 300 DPI is the floor, not a nice-to-have. Accuracy falls off a cliff below roughly 150 DPI and barely improves above 400.
- Scan in greyscale, not colour. Colour adds noise and file size without adding legibility.
- Straighten the page before scanning, not after. A 2° skew costs you more accuracy than most people expect.
- Photographs of documents are the worst input — uneven lighting and lens curvature defeat line detection.
- OCR reliably mangles some things even on a perfect scan — dot leaders, dense tables, and handwriting. Know what to check.
- Always verify numbers by hand. OCR fails silently: it returns a plausible wrong character, not an error.
What OCR is actually doing
A scanned PDF is a picture. There is no text in it — searching it finds nothing because there is nothing to find. OCR (optical character recognition) looks at the picture, finds shapes it believes are characters, and writes an invisible text layer on top of the image at the coordinates where each word appears.
That last part matters. A good OCR result looks identical to the original scan. You have not changed how it appears; you have added a layer underneath that search, copy and screen readers can reach. This is why the file gets bigger, and why the page still looks like a photocopy afterwards.
It also explains the failure mode. The engine is guessing at shapes. Given a clean, high-contrast, upright letter it guesses correctly essentially always. Given a blurred, skewed, low-resolution letter it still guesses — it just guesses wrong, and it does so without complaining.
The five things that decide your result
1. Resolution: scan at 300 DPI
If you change one setting, change this one.
Character recognition needs enough pixels per letter to distinguish an e from a c, or an 8 from a B. At 300 DPI, body text at 10–12pt gives the engine roughly 30–40 pixels of letter height, which is comfortable. At 150 DPI you have halved that, and the engine starts confusing character pairs that differ by a single stroke.
Going higher is mostly wasted. 600 DPI roughly quadruples your file size and processing time for an accuracy gain you will struggle to measure on ordinary printed text. Reserve it for small print, degraded originals, or documents with 6pt footnotes that genuinely matter.
2. Colour mode: greyscale beats colour
Colour scanning captures paper tint, ink bleed, highlighter, and the faint yellowing of an old page — all of which is noise as far as character recognition is concerned. Greyscale throws that away and keeps the only thing that matters: the contrast between ink and paper.
Pure black-and-white (1-bit) is a step too far for most documents. It forces every pixel to a hard decision, and thin strokes or faint ink simply vanish. Greyscale gives the engine the gradient information it uses to find edges.
3. Skew: straighten the paper, not the file
OCR engines find text by detecting horizontal baselines. A page rotated even 2° breaks that assumption, and the engine either merges lines that should be separate or splits words across what it thinks are two rows.
Deskewing software exists and helps, but it works by rotating and resampling the image — which softens every character slightly. It is strictly worse than putting the page in the feeder straight. If you are scanning a stack, take the extra five seconds to square it against the guide.
4. Lighting: use a scanner, not your phone
A phone photograph of a document has three problems a flatbed does not: uneven illumination across the page, perspective distortion from not being perfectly parallel, and lens curvature that bows straight lines near the edges.
If a phone is all you have, then photograph the page flat on a table in diffuse daylight — not under a single overhead lamp, which produces a bright centre and dark corners. Fill the frame with the page. Hold the phone parallel to the paper rather than leaning over it.
5. Layout: simple beats clever
A single column of printed prose is the easiest thing you can hand an OCR engine. Reading order is unambiguous, baselines are consistent, and there is nothing to confuse with a character.
Things that make it harder, roughly in order:
- Multiple columns — the engine may read straight across the gutter, interleaving two unrelated sentences.
- Text over images or shaded backgrounds — contrast collapses.
- Tables with ruled lines — the rules get read as characters (
|,l,1,-). - Rotated or vertical text — usually missed entirely.
- Handwriting — Tesseract-class engines are trained on print. Treat any handwritten result as unverified.
A real example of what still goes wrong
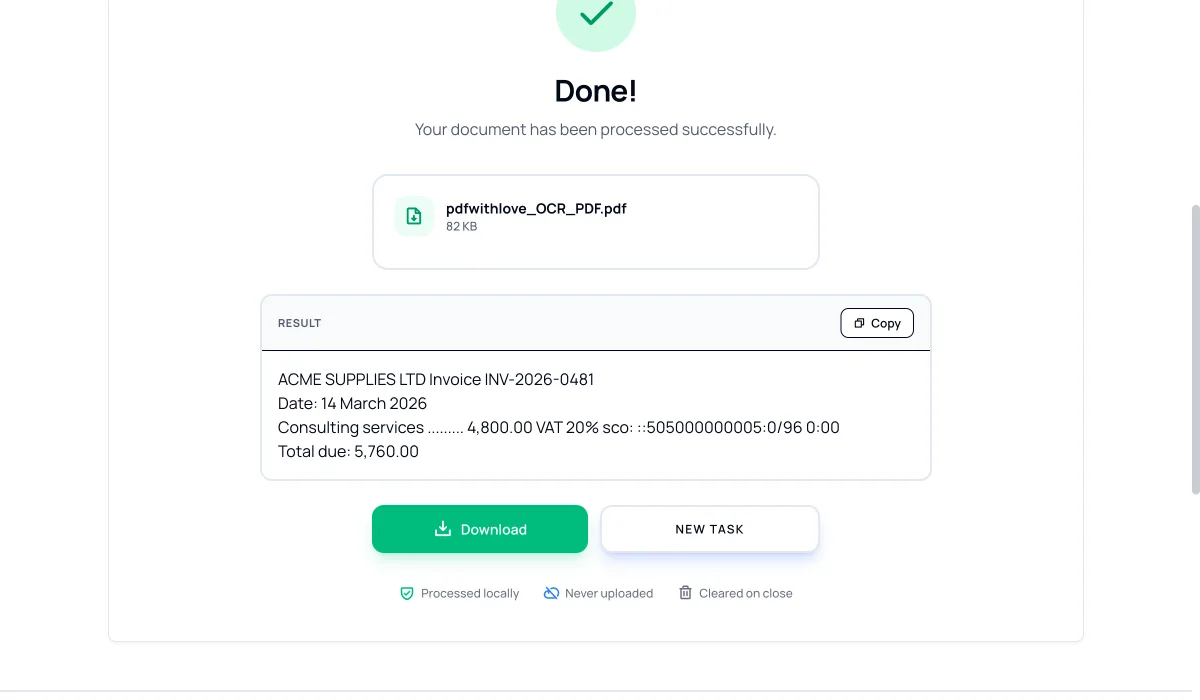
Here is a genuine result from running a scanned invoice through our own OCR tool. The scan was clean — generated at high contrast, upright, no noise. Most of it came back perfectly:
ACME SUPPLIES LTD
Invoice INV-2026-0481
Date: 14 March 2026
Consulting services ......... 4,800.00
Total due: 5,760.00
And one line came back like this:
VAT 20% sco: ::505000000005:0/96 0:00
The original read VAT 20% ..................... 960.00.
What happened is instructive. The row of dots between the label and the amount — a dot leader, the standard way of connecting a line item to its price — is a long run of small round marks. The engine tried to read them as characters, produced a string of colons and zeros, and in the confusion lost the 960.00 too.
This is the single most useful thing to know about OCR-ing financial documents: the layout convention that makes an invoice readable to you is the one that breaks recognition. Every other line on that page was perfect. The one with the dots was not, and nothing about the output signalled a problem.
The lesson is not "OCR is unreliable." It is: OCR is very reliable on prose and quietly unreliable on the parts of a document that carry the numbers. Check totals, account numbers, dates and reference codes by eye, every time.
Does OCR need to upload my document?
It depends entirely on the tool, and it is worth knowing which kind you are using — especially since the documents people most want to make searchable are contracts, medical records, tax filings and old correspondence.
Cloud OCR sends your file to a server, processes it there, and sends it back. That is how most online converters work, and it means the document — and whatever is in it — exists on somebody else's hardware, subject to their retention policy.
On-device OCR runs the recognition engine inside your browser using WebAssembly. The file is read into memory, processed, and never transmitted. Our OCR tool works this way.
There is one honest caveat worth stating plainly: on-device OCR has to download the recognition engine and its language model on first use — around 6 MB. Your document is not uploaded; the engine is downloaded to it. The browser caches the model afterwards, so subsequent runs need nothing. It is the opposite direction of travel from a cloud tool, and it is the only download involved.
Should I OCR the whole document or just the pages I need?
Just the pages you need, if you can — OCR is the slowest operation in any PDF toolkit, because every page has to be rendered to a bitmap and then analysed.
A practical sequence for a long document:
- Extract the page range you actually care about.
- Run OCR on that.
- If you need the searchable pages back inside the original, merge them in.
For a 300-page scanned report where you need chapter four, this is the difference between a few seconds and several minutes.
Why did my file get so much bigger?
Because you added a text layer to every page without removing anything. The images are still there at full resolution; the recognised text sits on top of them.
If size matters more than fidelity, compress the result afterwards. Do it in that order — compressing first degrades the images the OCR engine needs to read, which is precisely the resolution problem described above, self-inflicted.
A checklist before you scan
- Resolution set to 300 DPI
- Colour mode set to greyscale
- Page squared in the feeder or on the glass
- Flatbed or sheet feeder, not a phone camera
- Original is printed, not handwritten
- If it is a form or invoice, plan to verify the numbers manually
Get those six right and OCR will handle the overwhelming majority of ordinary business documents without complaint. Get the first two wrong and no amount of software will save the result.
Related tools
- OCR PDF — make a scanned document searchable, on your device
- PDF to Markdown — once a document has a text layer, convert it to clean Markdown
- Extract Pages — pull out just the pages you need first
- Compress PDF — reduce the size of the finished file